Turmeric, scientifically known as Curcuma longa, belongs to the Zingiberaceae family, which also includes ginger. If you’re wondering how to grow turmeric, you’ll be pleased to know that this plant thrives in a warm climate and has been cultivated for thousands of years in India.
With archaeological evidence pointing to its use over 4,000 years ago, turmeric has earned its reputation not only as a popular spice in cooking but also for its powerful medicinal properties. Both Eastern and Western medicine increasingly use turmeric for its health benefits, such as reducing inflammation and aiding digestion.
To grow turmeric at home, begin by planting rhizomes in well-drained soil that is rich in nutrients. Plant these nodules after the last frost date in spring to give the plant the best chance to thrive. Turmeric requires a warm environment with plenty of sunlight, making it an excellent choice for growing on an apartment balcony or in any sunny spot. The plant will grow steadily over about nine to ten months, during which time the rhizomes develop underground, storing all the valuable compounds. Regular watering is essential, but be cautious not to let the soil become waterlogged.
After nine to ten months, it’s time to harvest the turmeric. Gently dig up the plant to expose the rhizomes, and use them fresh for cooking or dry them for storage. Fresh turmeric is a flavorful addition to many dishes and offers a full range of health benefits. If you prefer convenience, supplements are available, though they tend to be expensive. Growing your turmeric allows you to enjoy it in its freshest form, giving you easy access to this powerful herb to support your diet and overall health. Whether you’re using it to make tea, add flavour to meals, or explore its medicinal properties, turmeric is a versatile plant worth having in your garden.
Varieties of Turmeric
Curcuma longa
The most well-known and widely used variety of turmeric, Curcuma longa, is recognized for its deep orange rhizomes. It is packed with curcumin, the compound responsible for its vibrant colour and its renowned medicinal properties. This variety offers a robust, pungent, and spicy flavour, making it ideal for most traditional turmeric uses, whether in cooking or as a supplement.
Hawaiian Red
Known for its reddish rhizomes, Hawaiian Red turmeric has a sweeter flavour compared to the typical spiciness of other varieties. This makes it an interesting choice for those who prefer a milder turmeric taste with the same nutritional benefits. Its colour is also less orange, leaning towards a reddish hue that makes it unique in appearance and flavour.
Indira Yellow
If you’re looking for a turmeric variety with a vibrant yellow colour and a more subtle taste, Indira Yellow is an excellent choice. This variety is milder, making it ideal for those who don’t enjoy the stronger, more pungent turmeric flavours. It still holds a fair amount of curcumin, contributing to its nutritional benefits, but with a much lighter taste profile.
White Mango
White Mango turmeric has a unique flavour profile, often compared to the taste of an underripe mango. The yellow rhizomes of this variety are less spicy and pungent compared to others, offering a much gentler flavour. It’s a great option for those looking for a mild turmeric flavour that can still pack a healthy dose of curcumin.
Each variety provides different flavour profiles and nutritional benefits, allowing you to experiment with flavours that best suit your cooking style and personal taste preferences.
How to Grow Turmeric at Home
Ideal Growing Conditions for Turmeric
To grow turmeric, creating the ideal conditions is key. Turmeric thrives in warm climates, and it requires well-drained soil. It’s crucial to avoid soggy soil or soil with heavy clay or muck, as this can lead to poor growth. The soil should retain moisture but also allow excess water to drain away. Plant turmeric in a spot where it gets full sun, but be mindful of providing mid-day shade in hotter climates. If you live in a cooler area, such as north of zone 7b, planting turmeric in containers allows you to move the plant indoors when the temperature drops, protecting it from frost.
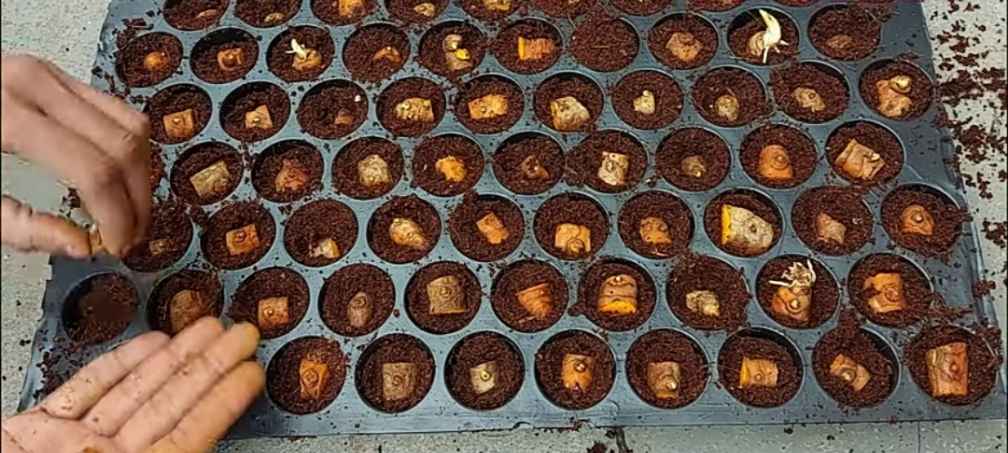
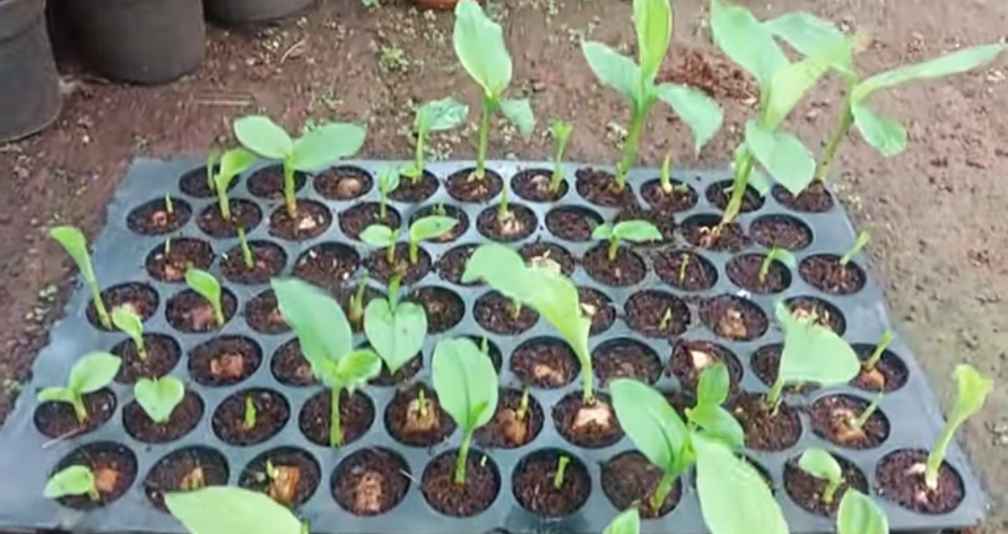
Planting Turmeric Rhizomes
Plant turmeric rhizomes in the spring, after the last frost date. Use fresh, healthy rhizomes, and bury them about 1-2 inches deep in the soil. As the rhizomes start to sprout, you’ll see new growth in the form of pleated leaves. Turmeric can grow up to four feet tall, with green stems and yellow flowers that bloom during summer. The plant prefers regular watering but doesn’t do well with drought or floods. Ensure the plant is protected from too much sun, as this can cause the leaves to become yellow and the tips to turn burnt. Keep the plant well-watered, but make sure it’s not stressed by excess moisture or sunlight.


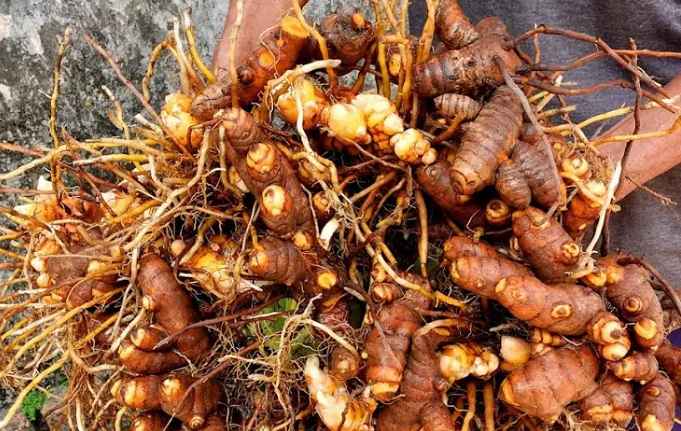
Harvesting Turmeric Rhizomes
After about nine to ten months, when the plant begins to flower and the leaves turn yellow, it’s time to harvest the rhizomes. Carefully snap off the rhizomes from the plant, making sure not to damage the roots. Rinse the rhizomes with a hose or nozzle, then air dry them in a cool place. After drying, you can store the rhizomes in dry peat or sawdust to keep them fresh until use. If growing in cooler areas, you can bring your container-grown turmeric indoors during winter, where it will be safe from freeze and frost. Periodically check for rot or pests, especially in the rhizomes, to ensure they stay healthy and usable for cooking or medicinal purposes.
Turmeric Plant Care
Watering Turmeric
When growing turmeric, proper watering is essential to ensure the plant thrives. During the spring, when the rhizomes are just starting to sprout, you should keep the soil mildly damp but avoid making it soggy. To check the moisture level, simply use your finger to probe the soil about an inch or two deep. Occasional water is usually enough, but in summer weather, when the plant is actively growing, you may need to water more frequently to keep the soil from drying out. However, make sure the soil is not waterlogged, as too much water can cause the rhizomes to start rotting.
As the growing season progresses, especially during fall and winter, you can cut back on watering, particularly if the weather becomes cooler or there’s rain. Once your turmeric is getting closer to the harvest date, stop watering completely, allowing the soil to become semi-dry. This will help the rhizomes mature properly before you uproot them. Keep in mind that spring rain or foggy weather can add extra moisture, so adjust your watering routine accordingly to avoid overwatering, which could lead to un-sprouted rhizomes or other issues.
Fertilizing Turmeric
Turmeric is a heavy feeder, meaning it requires regular fertilizing to grow well. When your turmeric is actively growing, particularly in the summer and fall, it’s important to provide a good supply of nutrients. A well-balanced fertilizer or compost works great. Many gardeners prefer using aged compost or chicken manure, a popular choice for feeding plants. You can apply a 1 to 2-inch layer of compost around the base of the plant, making sure to avoid direct contact with the plant stalks. This will ensure that the turmeric gets the nutrients it needs without overwhelming the plant.
As the growing season progresses, you may also want to top-dress the soil with an alfalfa meal or kelp meal to provide extra nutrition. During the mid and late growing season, consider adding a mild liquid fertilizer or aerated compost tea to maintain healthy growth. Always follow up with routine watering to ensure that the soil doesn’t dry out, and adjust your fertilizing schedule based on the plant’s needs. These applications will keep your turmeric happy and healthy, helping it grow strong and ready for harvest.
Turmeric Pests and Diseases
Although turmeric is a relatively low-maintenance and resilient crop, it can still face some issues, particularly in tropical climates. One of the most common problems comes from fungal diseases, which thrive in wet and overly warm conditions. If the soil becomes too moist, it can cause rhizomes to rot. Fungi and bacteria in the soil can attack the rhizomes, leading to yellowing at the base of the stem and yellow margins on the leaves. Over time, the leaves will wither, and the rhizomes can become soft and unusable.
If you notice rhizome rot or other signs of fungus in your turmeric, it’s important to adjust the growing conditions. Ensure the soil is well-draining and avoid planting in the same place year after year to prevent soil-borne diseases from re-infecting your plants. Poor planting techniques and trouble with the soil can exacerbate these problems, so be mindful of the medium that holds too much moisture. If your turmeric is impacted by disease, you may need to replant using healthy rhizomes from unaffected plants to save your crop for future harvests.
How to Harvest Turmeric
When it’s time to harvest your turmeric, you’ll notice that the leaves will start turning yellow-brown and dry, signaling that your plant is ready. This usually happens around 10 months after planting. Check the outermost leaves for signs of decline. Once this happens, it’s the perfect time to begin the harvest process. Be cautious when removing the stalks to avoid breaking them. Using a trowel or your hands, gently dig around the rhizomes to loosen the soil. Make sure to dig in a wide pattern to prevent damaging the turmeric.
Once the soil is loosened, you can pull up the rhizomes and scoop them out. Some resistance may be felt, but just continue until the rhizomes are free. To clean them, rinse the turmeric under water to remove any remaining dirt. Then, cut away the long roots and any damaged parts using clean scissors or snips. Allow the rhizomes to air dry before storing them in a cool, dry place, such as wine barrels or on a tarp. This will ensure they are properly dried for storage and can be used for future planting or culinary purposes. Be sure to remove any damaged skins and consider adding them to your composted material.
How to Preserve Turmeric
To preserve turmeric, it’s best to start by cleaning the rhizomes and drying them carefully. Whole rhizomes can be stored in the fridge for 2 to 3 weeks, while sliced or grated turmeric can be kept in the freezer. If you prefer, you can also dehydrate the turmeric using a dehydrator. Once dried, place the tubers in a jar with a tight lid to ensure they stay stored dry for longer periods. If you want to blitz turmeric into a fine powder, remember that the bright yellow stains can be hard to remove, so be mindful of handling.
For those seeking to enjoy turmeric benefits beyond its culinary uses, this versatile plant also serves as a beautiful ornamental addition to any garden. With its vibrant flowers and edible plant form, turmeric enhances your garden’s aesthetics while offering the health benefits of fresh turmeric. Just handle the rhizomes carefully to ensure they remain intact for future use.
Final Observations
Growing turmeric at home can be a rewarding experience, allowing you to enjoy fresh, flavorful rhizomes with numerous health benefits. With the right care, including proper watering, soil conditions, and fertilizing, turmeric can thrive even in non-tropical climates. Harvesting the turmeric at the right time ensures you’ll have fresh rhizomes for cooking, medicinal use, or storage. Whether you use it for its health benefits or culinary purposes, cultivating turmeric is a great way to bring this amazing plant into your home or garden.
Also, read my guide on:
Cilantro vs Parsley: Key Differences
FAQs
Q- How long does it take to grow turmeric?
It takes about 9 to 10 months for turmeric to grow from rhizomes to harvest.
Q- Can I grow turmeric at home?
Yes, turmeric can be grown at home, especially in warm climates or indoors in containers.
Q- Where does turmeric grow best?
Turmeric grows best in warm, tropical climates with well-drained, nutrient-rich soil.
Q- Does turmeric need full sun?
Yes, turmeric thrives in full sun, but it may need some mid-day shade in very hot climates.